Why the Easy No-Bake Oreo Cheesecake is Your New Go-To Dessert
Imagine a dessert that combines the iconic crunch and chocolatey goodness of Oreo cookies with the rich, creamy texture of classic cheesecake, all without ever turning on your oven. That’s precisely what you get with an
Easy No-Bake Oreo Cheesecake – a true game-changer for anyone craving an indulgent treat without the fuss of traditional baking. This stress-free dessert is perfect for home bakers of all skill levels, delivering impressive results with minimal effort.
Whether you're hosting a dinner party, planning a birthday celebration, or simply looking for a delightful make-ahead treat to satisfy your sweet tooth, this
oreo cheesecake no bake recipe is your ultimate solution. It’s incredibly versatile, requires no oven time (a huge plus during warmer months!), and is consistently a crowd-pleaser. The combination of a buttery, firm Oreo crust and a light, airy, cookie-packed cream cheese filling creates an irresistible symphony of textures and flavors that will have everyone asking for the recipe. Say goodbye to cracked cheesecakes and complicated water baths; your perfect dessert just got a whole lot easier!
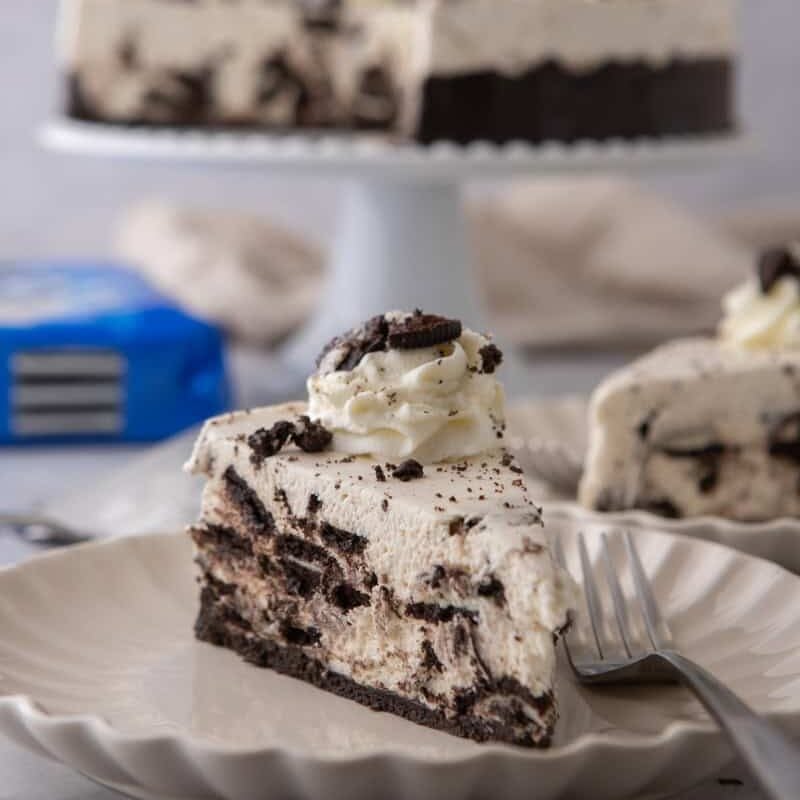
Essential Ingredients for Your Dreamy Oreo Cheesecake
Crafting a truly spectacular
oreo cheesecake no bake relies on a handful of quality ingredients, each playing a crucial role in achieving that perfect texture and flavor. Don't skimp on these essentials for the best possible results!
The Irresistible Oreo Crust:
- Oreo Cookies: The star of the show! You'll need plenty of these beloved chocolate sandwich cookies. For the crust, pulse them into fine crumbs, filling included, in a food processor. Don't worry about removing the cream filling; it adds to the richness and helps bind the crust. For the filling, you’ll want to chop some into larger pieces for delightful pockets of cookie goodness.
- Unsalted Butter: Melted unsalted butter is the magic binder that transforms your Oreo crumbs into a firm, sliceable crust. Using unsalted butter gives you control over the overall saltiness, allowing the sweet flavors to shine. Ensure it's fully melted and thoroughly mixed into the crumbs until they resemble wet sand.
The Velvety Cream Cheese Filling:
- Full-Fat Cream Cheese: This is non-negotiable for a stable, luscious no-bake cheesecake. Brands like Philadelphia cream cheese are ideal. Opting for full-fat varieties ensures your cheesecake sets properly and achieves that characteristic thick, creamy consistency. Low-fat options can result in a runnier, less stable filling. Remember to soften it to room temperature before mixing to prevent lumps.
- Powdered Sugar (Confectioners' Sugar): Unlike granulated sugar, powdered sugar dissolves seamlessly into the cold cream cheese mixture, ensuring a smooth, grit-free filling. It provides the perfect level of sweetness while also contributing to the filling's stable structure.
- Vanilla Extract: A splash of pure vanilla extract enhances all the other flavors, adding warmth and depth to your cheesecake.
- Cold Heavy Whipping Cream: This ingredient is key to achieving that fluffy, mousse-like texture. When whipped to stiff peaks and then gently folded into the cream cheese mixture, it lightens the filling considerably, making it airy and delightful. Ensure it's very cold for optimal whipping.
Optional, But Highly Recommended Toppings:
- Extra Whipped Cream: A generous dollop (or a beautiful piped border) of freshly whipped cream adds another layer of creaminess and visual appeal.
- Additional Oreos: Crushed or whole Oreos on top are the perfect garnish, reinforcing the delicious theme and adding a final touch of texture.
Step-by-Step Guide to Your Perfect No-Bake Delight
Creating this easy
oreo cheesecake no bake is a straightforward process. Follow these steps for a dessert that looks and tastes professionally made!
1. Prepare the Irresistible Oreo Crust:
- Crush the Oreos: In a food processor, pulse about 25-30 Oreo cookies (filling included) until they form fine, even crumbs. If you don't have a food processor, place them in a zip-top bag and crush them with a rolling pin or the bottom of a heavy glass.
- Combine and Press: Transfer the Oreo crumbs to a medium bowl. Pour in 6 tablespoons of melted unsalted butter and stir until the crumbs are thoroughly moistened and resemble wet sand.
- Form the Crust: Press the crumb mixture firmly and evenly into the bottom of a 9-inch springform pan. For easier removal, you can line the bottom with a parchment paper circle. If using an 8x8 inch square dish, line it with parchment paper, leaving an overhang on two sides to create "handles" for lifting the cheesecake out later.
- Chill: Place the crust in the refrigerator for at least 20 minutes to firm up while you prepare the filling. This crucial step helps prevent a crumbly crust when slicing.
2. Craft the Creamy Oreo Filling:
- Whip the Cream Cheese Mixture: In a large mixing bowl, beat 2 blocks (16 oz total) of softened full-fat cream cheese with 1 cup of powdered sugar and 1 teaspoon of vanilla extract using an electric mixer. Beat on medium speed until the mixture is completely smooth, light, and lump-free. Scrape down the sides of the bowl as needed.
- Whip the Heavy Cream: In a separate, chilled large bowl (a cold bowl helps cream whip faster), pour in 1 ¾ cups of cold heavy whipping cream. Beat on high speed with an electric mixer until stiff peaks form. Be careful not to over-whip, or it can become grainy.
- Fold Together: Gently fold the whipped cream into the cream cheese mixture using a spatula. Take care not to deflate the whipped cream; this step is key to the filling's light and airy texture. Fold until just combined, with no streaks of plain cream cheese remaining.
- Add More Oreos: Roughly chop about 10-15 more Oreo cookies. Gently fold these chopped pieces into the creamy filling, distributing them evenly.
3. Assemble and Chill:
- Layer the Filling: Spoon the finished oreo cheesecake no bake filling over your chilled Oreo crust. Use an offset spatula or the back of a spoon to spread it evenly to the edges.
- The Critical Chill: Cover the pan tightly with plastic wrap or aluminum foil. Refrigerate for a minimum of 6 hours, but ideally overnight (12+ hours), to allow the cheesecake to fully set and firm up. This extended chilling time is vital for stability and ensures clean slices. For more in-depth advice on achieving perfect stability, check out our guide on Master No-Bake Oreo Cheesecake: Tips for a Stable, Dreamy Dessert.
4. Garnish and Serve:
- Decorate: Before serving, carefully remove the cheesecake from the springform pan. You can pipe or spoon extra whipped cream around the top edges, then scatter additional whole or crushed Oreos for an appealing finish.
- Slice and Enjoy: Use a sharp knife dipped in hot water and wiped clean between each slice for the cleanest cuts.
Mastering Your No-Bake Oreo Cheesecake: Pro Tips & Tricks
While this
easy oreo cheesecake recipe is forgiving, a few expert tips can elevate your creation from good to absolutely phenomenal.
*
Room Temperature Cream Cheese is Key: Seriously, this makes all the difference. Cold cream cheese will result in lumps, no matter how long you beat it. Take it out of the fridge at least an hour before you start.
*
Don't Overmix the Filling: Once the cream cheese, sugar, and vanilla are smooth, stop beating. When folding in the whipped cream, be gentle. Overmixing can incorporate too much air, which can cause the cheesecake to be less stable or even weep liquid.
*
Chilling is Non-Negotiable: We cannot stress this enough! The "no-bake" part of the name means there's no oven to set the ingredients. The refrigerator does all the heavy lifting. A well-chilled cheesecake is firm, easy to slice, and has a superior texture. Planning ahead is your best friend here.
*
Consider Your Pan: A springform pan is ideal for presentation, allowing you to easily release the cheesecake without damaging the sides. If you use a regular pan, the parchment paper sling method is crucial for easy removal.
*
Vary the Oreos: Feel free to experiment with different Oreo flavors! Mint Oreos make a fantastic festive cheesecake, peanut butter Oreos add a rich twist, or even seasonal varieties can create a unique dessert experience.
*
Make-Ahead Magic: This
stress-free dessert is a dream for meal prep or party planning. You can make it 1-2 days in advance, keeping it tightly covered in the refrigerator. The flavors often meld even more beautifully over time.
*
Storage: Store any leftover cheesecake tightly covered in the refrigerator for up to 3-4 days.
Conclusion
There you have it – the ultimate guide to creating a truly spectacular, yet incredibly easy,
no-bake Oreo cheesecake. This recipe isn't just about combining delicious ingredients; it's about enjoying the process, eliminating baking stress, and delighting in a dessert that consistently impresses. With its rich, crunchy Oreo crust and light, creamy, cookie-studded filling, this oven-free cheesecake is destined to become a staple in your dessert repertoire. So gather your ingredients, follow these simple steps, and prepare to indulge in a slice of pure, stress-free bliss! Happy no-baking!