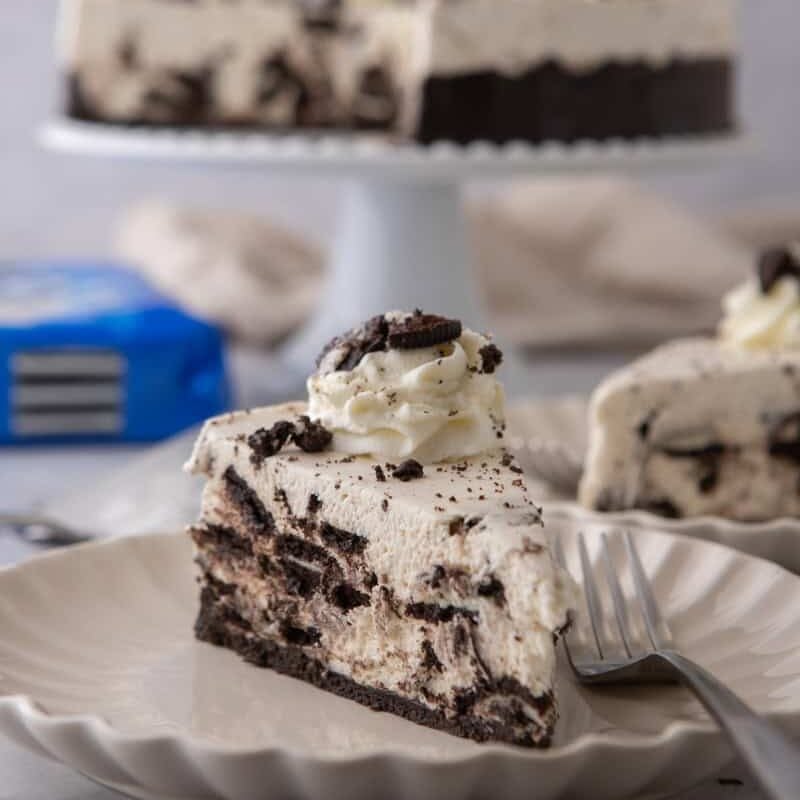
Creamy No-Bake Oreo Cheesecake: The Ultimate Oreo Lover's Treat
Imagine a dessert that combines the iconic crunch and chocolatey goodness of Oreo cookies with the smooth, tangy decadence of a classic cheesecake. Now, imagine achieving this without ever turning on your oven. Welcome to the world of the
oreo cheesecake no bake, a culinary marvel that promises rich flavors, irresistible textures, and surprising ease. Perfect for any occasion – from casual family dinners to celebratory gatherings – this no-bake wonder is a testament to the fact that some of the best treats require no baking at all. Dive in to discover how you can create this heavenly dessert that will undoubtedly become a staple in your recipe collection.
Why Choose a No-Bake Oreo Cheesecake? The Appeal of Effortless Indulgence
The allure of a
no-bake Oreo cheesecake extends far beyond its exquisite taste. For many, the greatest appeal lies in its inherent simplicity and the elimination of baking stress. Unlike traditional cheesecakes that often demand a water bath, precise oven temperatures, and careful cooling to prevent cracks, a no-bake version streamlines the process entirely. This makes it an ideal choice for novice bakers, busy hosts, or anyone looking for a foolproof dessert that delivers maximum impact with minimal fuss.
Furthermore, the no-bake aspect makes it a stellar summer dessert. On sweltering days when the mere thought of turning on the oven is unbearable, a chilled, creamy cheesecake offers a refreshing contrast. It’s also a fantastic make-ahead option, allowing you to prepare it hours, or even a full day, in advance. This frees you up to enjoy your guests or focus on other party preparations, making your dessert course a stress-free delight. If you're looking for the ultimate stress-free dessert, explore our article on
Easy No-Bake Oreo Cheesecake: Perfect Stress-Free Dessert.
The Essential Ingredients for Your Dreamy Dessert
Crafting the perfect
oreo cheesecake no bake relies on a handful of key ingredients, each playing a crucial role in achieving that velvety texture and rich flavor. Quality matters here, so choose your components wisely.
*
Oreo Cookies: Unsurprisingly, Oreos are the star! You’ll need plenty – some for the buttery crust and a generous amount for the filling. For the crust, pulse the entire cookie, including the cream filling, into fine crumbs. For the filling, roughly chop them to provide delightful chunks of cookie in every bite, adding both flavor and texture.
*
Unsalted Butter: This binds your Oreo crumbs together, forming a sturdy, delicious crust that holds its shape beautifully when chilled. Ensure it’s melted to evenly coat the crumbs.
*
Full-Fat Cream Cheese: This is the backbone of your creamy filling. Opt for full-fat, brick-style cream cheese (like Philadelphia). Its higher fat content is vital for achieving the thick, stable consistency characteristic of a luscious cheesecake. Lower-fat alternatives can result in a runny or less stable filling. Remember to soften it to room temperature before beating to prevent lumps.
*
Powdered Sugar (Confectioners' Sugar): Sweetens the filling while also contributing to its smooth, silken texture. Unlike granulated sugar, powdered sugar dissolves instantly, ensuring no grittiness in your final product.
*
Vanilla Extract: A splash of good quality vanilla extract enhances the overall flavor profile, complementing the sweetness and the tang of the cream cheese.
*
Cold Heavy Whipping Cream: This is what gives your cheesecake its light, airy, mousse-like consistency. It's crucial that the cream is *very cold* to whip properly into stiff peaks. This aerated cream is then gently folded into the cream cheese mixture, providing that luxurious fluffiness without deflating the mixture.
Crafting Your Creamy Masterpiece: Step-by-Step Guide
Bringing your
oreo cheesecake no bake to life is a straightforward process, broken down into three main stages: the crust, the filling, and the chilling.
The Perfect Oreo Crust
1.
Prepare the Crumbs: Take about 25-30 Oreo cookies (a standard package usually contains enough) and place them whole into a food processor. Pulse until they are finely ground into even crumbs. If you don't have a food processor, you can place them in a zip-top bag and crush them with a rolling pin.
2.
Combine with Butter: Melt 6-8 tablespoons of unsalted butter. Pour the melted butter over the Oreo crumbs and stir until the mixture is thoroughly combined and resembles wet sand. Every crumb should be moistened.
3.
Form the Base: Press the crumb mixture firmly and evenly into the bottom of a 9-inch springform pan. For easier serving and cleaner slices, you can line the bottom of the pan with a circle of parchment paper before adding the crust. Alternatively, if using a regular 8x8-inch square dish, line it with parchment paper leaving an overhang on the sides – this will help you lift the entire cheesecake out later.
4.
Chill: Place the crust in the refrigerator for at least 20-30 minutes while you prepare the filling. This allows the butter to solidify, creating a firm foundation.
The Irresistible Cream Cheese Filling
1.
Beat Cream Cheese Mixture: In a large mixing bowl, combine the softened full-fat cream cheese, powdered sugar, and vanilla extract. Using an electric mixer (handheld or stand mixer), beat on medium speed until the mixture is completely smooth, light, and free of any lumps. Scrape down the sides of the bowl as needed.
2.
Whip the Cream: In a separate, very cold large bowl (you can chill the bowl and whisk attachments for 15 minutes prior for best results), pour the cold heavy whipping cream. Beat on high speed until stiff peaks form. Be careful not to over-whip, which can turn it grainy.
3.
Fold Gently: Carefully, using a spatula, fold the whipped cream into the cream cheese mixture. The key here is gentle incorporation to maintain the airiness of the whipped cream. Do not beat or vigorously stir.
4.
Add Oreo Chunks: Take another 10-15 Oreo cookies, roughly chop them into bite-sized pieces, and gently fold them into the creamy filling until evenly distributed.
Assembly and Chilling for Perfection
1.
Layer and Smooth: Spoon the creamy Oreo filling over the chilled crust in the springform pan. Use an offset spatula or the back of a spoon to spread it evenly and smooth the top.
2.
Final Chill: Cover the pan tightly with plastic wrap or aluminum foil. This is the most crucial step for setting the cheesecake. Refrigerate for at least 6 hours, but for the best, most stable results, allow it to chill overnight (12-24 hours). This extended chilling time allows all the ingredients to meld and the fat to firm up, resulting in perfectly sliceable cheesecake.
Tips for No-Bake Cheesecake Success & Creative Variations
Achieving a picture-perfect
oreo cheesecake no bake is simple, but a few expert tips can elevate your creation from good to absolutely phenomenal.
*
Temperature Matters: Ensure your cream cheese is at room temperature for a smooth, lump-free filling, but your heavy cream must be *ice cold* to whip properly into stiff peaks.
*
Don't Overbeat the Cream Cheese: While you want it smooth, overbeating cream cheese can incorporate too much air, which can destabilize the filling. Beat just until smooth and fluffy.
*
Gentle Folding is Key: When folding in the whipped cream, be delicate. The air incorporated into the whipped cream is essential for the cheesecake’s light, mousse-like texture.
*
The Chilling Game: This cannot be stressed enough – proper chilling time is non-negotiable for a stable cheesecake. Resist the urge to cut corners; patience will be rewarded with perfectly set slices. If you want to dive deeper into ensuring your cheesecake sets perfectly every time, check out
Master No-Bake Oreo Cheesecake: Tips for a Stable, Dreamy Dessert.
*
Garnish Creatively: Before serving, elevate your cheesecake with a dollop of fresh whipped cream, additional crushed Oreo crumbs, whole mini Oreos, chocolate shavings, or a drizzle of chocolate fudge sauce.
*
Storage: Store leftover cheesecake covered in the refrigerator for up to 3-4 days.
For those feeling adventurous, consider these delightful variations:
*
Mint Oreo Cheesecake: Use mint Oreos for both the crust and the filling for a refreshing twist. A few drops of peppermint extract in the filling can amplify the flavor.
*
Peanut Butter Oreo: Swirl in some melted peanut butter into a portion of the cream cheese filling for a rich, nutty addition.
*
White Chocolate Oreo: Melted and cooled white chocolate can be folded into the cream cheese mixture for an extra layer of sweetness and creaminess.
*
Individual Servings: Instead of a large pan, press the crust into the bottom of individual ramekins or mason jars, then spoon in the filling for charming single-serve desserts.
In conclusion, the
creamy no-bake Oreo cheesecake is more than just a dessert; it’s a celebration of ease, flavor, and pure cookie bliss. Its simple preparation belies its incredibly decadent taste and impressive presentation. Whether you’re a seasoned baker or a kitchen novice, this recipe empowers you to create a show-stopping treat that will earn rave reviews. So, gather your ingredients, clear some space in your refrigerator, and prepare to indulge in the ultimate Oreo lover's dream.